


How to Submit a Blogger Sitemap to Google Search Console
Introduction: Help Google discover your Blogger posts
Imagine that you have spent several hours writing a useful article on your Blogspot website. You publish it, share it on social media, and wait for visitors. However, when you search for the article on Google, you cannot find it.
One possible reason is that Google has not discovered or indexed the page yet. A sitemap can help Google find your published URLs and understand which pages you want it to discover.
Blogger automatically generates a sitemap for your blog, so you generally do not need to create one manually. Your task is to check the sitemap URL, add your blog to Google Search Console, and submit the sitemap.
Let’s walk through the process step by step.
What is a Blogger sitemap?
A sitemap is a file that lists URLs on a website to help search engines discover content. It can also provide information such as when a page was last modified, where supported.
For Blogger users, the main sitemap is normally available at the root of the blog’s domain.
For example, if your blog address is:
https://seo-insights.blogspot.com/
Your sitemap URL is:
https://seo-insights.blogspot.com/sitemap.xml
Replace mydigitalblog with your actual Blogspot subdomain.
Google explains that submitting a sitemap means telling Google where the sitemap is located; it does not mean uploading the file to Google.
Why should you submit a Blogger sitemap?
Submitting a sitemap is useful because it helps Google discover URLs, particularly when a blog has recently been created or has many posts.
Here are the main benefits:
- Content discovery: Helps Google find published posts and other URLs included in the sitemap.
- New blog support: Gives Google another way to discover content on a blog with few external links.
- Crawl monitoring: Lets you see whether Google could process the submitted sitemap.
- Indexing diagnostics: Helps you investigate whether discovered pages are appearing in Google’s index.
- SEO management: Provides a central place to monitor sitemap processing alongside other Search Console reports.
Remember that a sitemap is a discovery aid, not a ranking tool. It does not guarantee crawling, indexing, or higher positions in search results.
Step 1: Find your Blogger sitemap URL
First, open your browser and enter your blog’s sitemap address.
For a standard Blogspot address, use:
Example sitemap URL
https://seo-insights.blogspot.com/sitemap.xml
Copy example URL
Replace the example domain with your own blog address before using it.
What should you see?
Your browser should display an XML document or a browser-formatted XML view containing sitemap information. You should not see a normal blog homepage or an unrelated error page.
If you use a custom domain for your Blogger website, use the domain that serves your blog, for example:
https://www.seoinsights.co.in/sitemap.xml
Make sure you use the correct HTTPS version and hostname that actually works for your site.
Blogger also provides a separate sitemap for static pages, normally at:
https://seo-insights.blogspot.com/sitemap-pages.xml
You can submit this additional sitemap if your blog has published static pages, such as About or Contact. Check that it opens correctly first.
Step 2: Add your Blogger website to Google Search Console
If you already see your Blogger website in Search Console and can access its reports, you can skip to Step 3.
Otherwise, follow these instructions.
- Open Google Search Console.
- Sign in with your Google account.
- Open the property selector and choose the option to add a property.
- Select URL prefix.
- Enter your complete Blogger URL, including https:// and the correct hostname.
- Continue through the verification process.
For example:
https://seo-insights.blogspot.com/
Google-hosted properties, including Blogger sites, may be verified automatically when you use the same Google account that manages the blog. If automatic verification does not work, follow the verification method displayed in Search Console.
Important: If your blog uses a custom domain, add the correct custom-domain property too. A URL-prefix property covers only URLs that begin with its specified protocol and prefix.
Step 3: Open the Sitemaps report
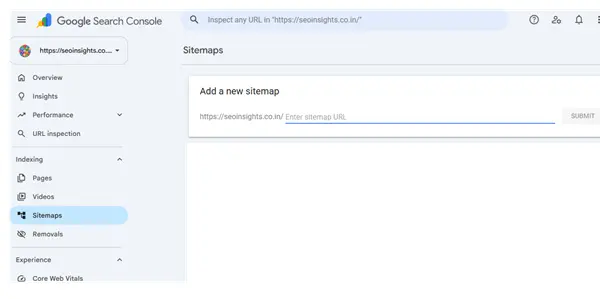
Once your property is verified:
- Select your Blogger property from the Search Console property selector.
- Find Sitemaps in the left-hand navigation.
- Open the Sitemaps report.
- Locate the field labelled Add a new sitemap.
This is where you tell Google which sitemap file to process. Google documents this workflow in its official Sitemaps report guide.
Step 4: Submit the Blogger sitemap
This is the main step.
If your selected property is https://mydigitalblog.blogspot.com/, enter the sitemap path:
sitemap.xml
Do not include the spaces shown in the formatted example. Enter only:
sitemap.xml
Then click Submit.
Search Console generally combines the path with the selected property’s URL to identify the sitemap. If your interface accepts a complete URL instead, follow the format shown there.
Example: Correct sitemap submission
Selected property
https://seo-insights.blogspot.com/
Sitemap path to enter
sitemap.xml
Full sitemap address
https://seo-insights.blogspot.com/sitemap.xml
After submission, Search Console should display a confirmation or an updated sitemap entry. The status and processing information may take time to update.
If you have published static pages and have confirmed that the separate page sitemap is accessible, you can submit sitemap-pages.xml as a second entry.
You do not need to submit the same sitemap repeatedly just because Google has not indexed every post. First check the processing status and investigate any reported errors.
Step 5: Check the sitemap status
After submitting your sitemap, return to the Sitemaps report and inspect its status.
The wording can vary depending on the processing state.
| Status or message | What it means | What to do |
| Success | Google processed the sitemap successfully | Continue monitoring indexing |
| Couldn’t fetch | Google could not retrieve the sitemap at that time | Check the URL, accessibility and robots rules |
| Couldn’t read | Google could not successfully parse or process the file | Confirm that the URL returns a valid sitemap |
| Pending | Processing has not finished | Wait and check again |
| Sitemap not found | The submitted address may be incorrect or unavailable | Correct the sitemap path and retest it |
A successful status means Google could process the sitemap. It does not mean every URL listed in it has been indexed.
Google’s Sitemaps report documentation explains how to monitor submitted sitemaps and their processing errors.
Step 6: Check whether Google has indexed your posts
Submitting the sitemap is only part of the process. The next task is to check individual URLs.
Suppose you publish this post:
https://seo-insights.blogspot.com/2026/10/how-to-create-a-blog-on-blogger.html
To inspect it:
- Open Google Search Console.
- Select the correct blog property.
- Enter the full post URL in the URL Inspection tool.
- Review the indexing information.
- If the page is eligible and there is no blocking issue, use Request indexing when available.
The inspection report may indicate whether the URL is indexed, whether Google has discovered or crawled it, and whether any indexing problem was detected.
Requesting indexing is not a guarantee of inclusion in Google Search. It can also take time for Google to crawl and evaluate a page.
How to check indexing directly in Google
You can also try a Google search such as:
site: seo-insights.blogspot.com/2026/10/how-to-create-a-blog-on-blogger.html
Replace the example URL with your own page.
If the page appears, it is a useful indication that Google has indexed it. However, a site: search is not a complete or definitive index-status report. Use URL Inspection in Search Console for a more reliable diagnosis.
Step 7: Optimize your Blogger settings for discovery
After submitting the sitemap, review your blog’s basic SEO settings.
Enable search engine visibility
In Blogger:
- Open your Blogger dashboard.
- Select Settings.
- Find the Privacy section.
- Check that Visible to search engines is enabled.
The exact placement or wording can change as Blogger’s interface evolves.
Review custom robots.txt settings
Blogger normally generates its sitemap automatically. Avoid adding custom robots.txt rules unless you understand their effect.
A rule that blocks Googlebot from accessing important posts can interfere with crawling. If you have already customized robots.txt or robots header tags, check that your important posts and pages are not accidentally blocked or marked noindex.
Do not disable or change existing settings blindly. Review the rules and test affected URLs before making changes. Blogger’s official Help Community provides platform-specific guidance.
Publish useful, original content
A sitemap cannot compensate for thin, duplicated, inaccessible or low-value content.
For better discoverability:
- Write descriptive post titles that reflect what readers are searching for.
- Use clear headings and logical article structure.
- Link related posts together where it helps readers.
- Write useful meta descriptions when Blogger’s settings or your template support them.
- Add descriptive alt text to meaningful images.
- Keep important pages accessible through your blog navigation or internal links.
These practices improve usability and help search engines understand your content. They do not guarantee rankings.
Common Blogger sitemap problems and how to fix them
Even after you submit the correct sitemap, Search Console may report an error or show fewer indexed pages than you expected. Here is how to investigate the most common issues.
-
Google Search Console says “Couldn’t fetch”
Start by opening your sitemap directly in a browser.
Check the following:
- The URL is spelled correctly.
- The sitemap loads without an access error.
- The correct HTTPS hostname is being used.
- The sitemap is not blocked by robots.txt or another access restriction.
- The blog is publicly accessible.
If everything appears correct, allow time for processing and check the report again. A temporary fetching issue does not necessarily mean your sitemap is permanently broken.
-
The sitemap is submitted, but posts are not indexed
A sitemap helps Google discover URLs; it does not force Google to index them.
Open URL Inspection for a post that is missing from search results. Check whether the page is discovered, crawled, blocked, marked noindex, or affected by a canonical URL issue.
Also confirm that the post is published and accessible to visitors. Fix any identified technical problems before requesting indexing again.
-
Search Console shows fewer indexed pages than published posts
Not every published post will necessarily be indexed. Google may exclude URLs for several reasons, including duplicate content, redirects, crawling restrictions, or its assessment of the page.
Open the Page Indexing report and examine the reasons listed for excluded URLs. Investigate important posts individually rather than assuming the sitemap has failed.
-
Should you submit a Blogger feed instead?
Blogger feeds and sitemaps serve different purposes. A feed can provide another way for systems to discover recent content, but it is not a substitute for the standard sitemap.
For a typical Blogger website, start with:
sitemap.xml
You can also submit the separate static-page sitemap if it is available and relevant to your blog. Avoid submitting multiple alternative URLs without a clear reason.
-
Does a custom domain change the sitemap URL?
Yes, the hostname should match the domain that serves your blog.
For example, if your Blogger website uses https://www.seoinsights.co.in/, test:
https://www.seoinsights.co.in/sitemap.xml
Do not automatically use the original Blogspot address if you have moved to a custom domain. Check redirects and ensure you have selected the correct property in Search Console.
For official guidance, refer to Google’s property setup instructions and sitemap documentation.
Key Takeaways
- Blogger normally generates its sitemap automatically, so you do not need to create an XML file manually.
- The standard sitemap URL is https://yourblog.blogspot.com/sitemap.xml.
- Add and verify the correct Blogger property in Google Search Console before submitting the sitemap.
- Open Sitemaps, enter sitemap.xml in the submission field, and click Submit.
- Consider submitting sitemap-pages.xml separately if you have published static pages and the file is accessible.
- Use URL Inspection and the Page Indexing report to investigate missing posts.
- Sitemap submission helps Google discover content but does not guarantee indexing or higher rankings.
Frequently Asked Questions (FAQs)
-
What is the correct sitemap URL for Blogger?
The standard Blogger sitemap URL is https://seo-insights.blogspot.com/sitemap.xml. Replace yourblog with your actual Blogspot subdomain. For a custom-domain blog, use the working custom-domain URL.
-
Is a sitemap automatically generated by Blogger?
Yes. Blogger normally generates its sitemap automatically. You generally do not need a separate sitemap plugin or manually created XML file. You can check the sitemap by opening its URL in your browser.
-
How do I submit a Blogger sitemap to Google Search Console?
Open Google Search Console, select your verified Blogger property, navigate to Sitemaps, enter sitemap.xml in the submission field, and click Submit. Then monitor the status in the same report.
-
How long does Google take to index Blogger posts after sitemap submission?
There is no fixed indexing deadline. Google may discover, crawl and evaluate pages over time, but some pages may take longer or may not be indexed. Check URL Inspection for the status of individual posts rather than relying only on the sitemap submission date.
-
Why is my Blogger sitemap not working in Google Search Console?
Common causes include an incorrect sitemap URL, a temporary fetching problem, access restrictions, robots.txt rules, or a processing error. Open the sitemap directly, verify the selected property and URL, and review the error reported by Search Console before making changes.
Conclusion
Submitting a Blogger sitemap to Google Search Console is a straightforward but useful step in managing your blog’s SEO. Blogger normally creates the sitemap automatically, so you mainly need to verify your website, submit the correct URL, and monitor Google’s response.
Once the sitemap is submitted, pay attention to individual post indexing, crawl restrictions, internal links and content quality. If a post does not appear in Google, use URL Inspection to identify the actual issue instead of repeatedly resubmitting the sitemap.
The most important thing to remember: a sitemap helps Google discover your content, while useful content, accessibility and appropriate technical settings help Google evaluate whether those pages should appear in search results.
For further guidance, visit the official Google Search Console Help Center and Blogger Help Center.
For more articles on Blogger: